


Accessing Profile Field Data in IPS
A Mousie guide
Those who are used to the JCink custom profile fields system will quickly note that IPS doesn't allow you to define your own "template key" for fields to be worked into your themes. This is largely due to the fact that the template logic system included with IPS allows access to not just custom profile field data, but user data, forum data, record data and whatever else you might find useful.
This particular tutorial will focus on accessing user profile field data in the postContainer, but the method remains basically the same for retrieving and outputting data in other locations. Consider:
- Information about the user who posted a record in any database
- Information about a forum in the forum row
- Information about a topic in the topic row
- Information about the currently logged-in user almost anywhere
Note: This tutorial does require directly editing theme templates. Please note that template files that have been modified are not upgraded during automatic IPS upgrading processes and will need to be manually adjusted any time the software is updated.
1. Find your template
First you need to find the template you'll be working in. For the purposes of this tutorial, we'll be focusing on the postContainer template. This is the template that wraps around the post text, and includes the author information (also known as the "mini profile") in thread views.
By default, any custom user profile fields that are set to display will display as a list. It's not especially pretty, but it is functional. It's also very responsive, so if you don't have a lot of custom profile fields/can make them look the way you want purely with CSS that is a better route to go. But if you want complete control to move fields around individually, keep reading.
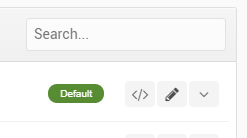
Open up your Theme Editor by going Themes --> Edit HTML/CSS. That's the </> button to the right of the theme list row.
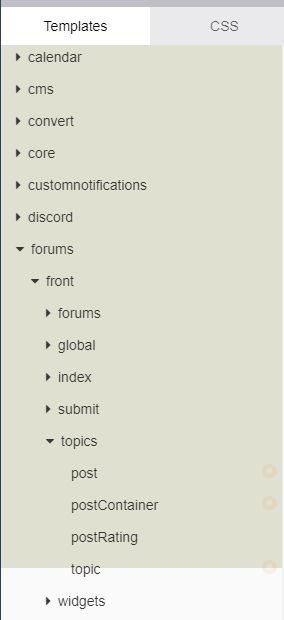
From there, navigate to Forums --> Topics --> postContainer under the Templates window.
Open up the postContainer file, and in the right window you'll be able to view and modify the code.
Some things to note when editing templates:
- Files do not autosave. You will need to save changes before they appear on the site.
- If you mess the template up to the point where it no longer works, but you have no idea how to fix it -- there is a "revert" button. This will return the template to the absolute default, erasing every change you ever made to that template. Useful if you're in a bind, but frustrating if you've made a lot of edits you'll need to remake. I suggest making small edits, saving, and checking your work. That way you'll have more of an idea of what you broke, rather than having to start from scratch.
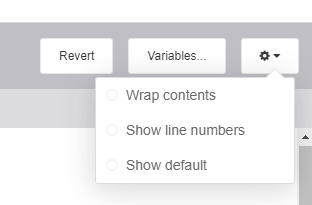
- If you've broken it but don't want to reach for the "revert" button yet, you can view your modified template side-by-side with the original. The "show default" setting, when enabled, shows both versions in split screen with differences notated. Very useful!
2. Identify the custom profile fields
Somewhere in your postContainer template, doesn't matter where, enter the following code:
{{$profileFields = $comment->author()->profileFields();}}
{{print_r( $profileFields ); exit;}}
What this does is asks the system to find all of the entries under profileFields for the user who wrote the post ($comment->author()), and to store that information in a variable we've called $profileFields.
The second line asks the system to print that list of information, and exit all processing once the list is printed.
When you refresh a thread, you'll get a page that looks terrifying. Something a little like this:
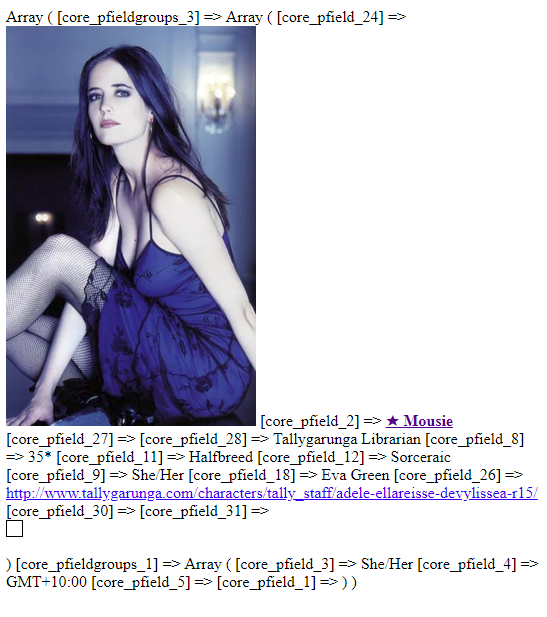
Right click and "view source" to see it in a format that is easier to follow:
Array ( [core_pfieldgroups_3] => Array ( [core_pfield_24] => <img src="//content.invisioncic.com/j280720/monthly_2018_02/delav.png.049b569d65e428236644a0bf16355725.png" class="ipsImage" data-ipsLightbox> [core_pfield_2] => <a href="http://www.tallygarunga.com/profile/1-mousie/" data-ipshover data-ipshover-target="http://www.tallygarunga.com/profile/1-mousie/?do=hovercard&referrer=http%253A%252F%252Fwww.tallygarunga.com%252Ftopic%252F519-and-a-very-merry-unwedding-to-you-april-1st-2018%252F%253Fpage%253D2%2526tab%253Dcomments" title="34e92ffb66b0e77b6dafd08a4e8629f3" class="ipsType_break"><span class="admin"><b>★ Mousie</b></span></a> [core_pfield_27] => [core_pfield_28] => Tallygarunga Librarian [core_pfield_8] => 35* [core_pfield_11] => Halfbreed [core_pfield_12] => Sorceraic [core_pfield_9] => She/Her [core_pfield_18] => Eva Green [core_pfield_26] => <div class='ipsType_break ipsContained'><a href='http://www.tallygarunga.com/index.php?app=core&module=system&controller=redirect&url=http://www.tallygarunga.com/characters/tally_staff/adele-ellareisse-devylissea-r15/&key=8bb2eb86b891ce18fa43bfa4d80f7e7cfc044fdfa09040d1bc040051c2c2c3a1&resource=' target='_blank'>http://www.tallygarunga.com/characters/tally_staff/adele-ellareisse-devylissea-r15/</a></div> [core_pfield_30] => [core_pfield_31] => <div class="ipsClearFix"> <div style="background-color: ; height: 15px; width: 15px; border: 1px solid black;" class="ipsPos_left"></div><div class="ipsPos_left"> </div> </div> ) [core_pfieldgroups_1] => Array ( [core_pfield_3] => She/Her [core_pfield_4] => GMT+10:00 [core_pfield_5] => [core_pfield_1] => ) )
This is the HTML and information set that made that terrifying looking page. You can see here how the profile fields show next to their column names in the database. We need that information, so copy and paste this into a separate document, and we'll fix the page up so you can use it again!!
3. Un-breaking the template
All you need to do here is remove this line:
{{print_r( $profileFields ); exit;}}
Save the template, and refresh. It should have gone back to normal, and now you have all the information you need to locate and output your custom profile fields!
Note: Because this does break the thread view, it's not recommended to look this stuff up during busy times on your board. You can run this in a different theme that only you have access to, and it won't affect the main board. Or you can be like me, and do it anyway when you feel like. Don't be like me.
4. Allocate variables to the profile fields
Looking at that list, I can see that each of the profile fields is under a particular group, and assigned to a particular name. We assign them to a variable using the following line of code:
{{$age = $profileFields['core_pfieldgroups_3']['core_pfield_8'];}}
Here you can see that I've created the variable $age (this can be anything, but it helps if it relates to what you're using it for!) and I've told the system that when we use $age, I want it to find the data stored under core_pfield_8, which is in the core_pfieldgroups_3 array contained in $profile fields.
To get different information, adjust the array and field names. So:
{{$playbi = $profileFields['core_pfieldgroups_3']['core_pfield_18'];}}
Accesses the play-by name that is held in core_pfield_18 under core_pfieldgroups_3.
And:
{{$timezne = $profileFields['core_pfield_groups_1']['core_pfield_4'];}}
Will access the information for the timezone in core_pfield_4, under core_pfieldgroups_1.
So you can see how the code relates to the array list that we accessed before. Once you've created a variable for each of the fields you'd like to use, they're far easier to slot into your code.
4a. Accessing non-custom profile fields
But what about other member information? The array listed above only covers fields created by the admin. There's a different way to access those.
As before, put this piece of code into your template.
  {{$userFields = $comment->author();}}
  {{print_r( $userFields ); exit;}}
Note that it doesn't ask the system to look only for profileFields -- this will output a list of all information tied to the member's account. It does include the custom profile field array, and also information related to the member's group. But what we're interested in is toward the bottom with the array that begins with [member_id].
Not all of these are especially useful, but some I like to include in mini profiles are the number of posts (found under [member_posts]) and the member title (found under [member_title]).
Once you've got the information for the user fields that you want, delete both lines of code added in 4a from your template, save, and refresh. You should only have the single line of code added in 4 remaining (as this defines the $profileFields list used when creating variables). We don't need this for standard user fields, as we can access those in a different way. The list makes it easier to see what they're called.
5. Outputting the variable data
To print the data from any variable, all you need to do is insert it into your template inside single curly brackets. Eg:
{$age}
As long as it is further down the template than the code lines that define the variable, this will display the content contained in that field. You can wrap this in HTML to make it pretty, shift it around to where you want it, it's your variable to do with as you like!
To output the data of regular profile fields, we take a different approach. This will show the number of posts the member has made:
{$comment->author()->member_posts}
Or to show the member title:
{$comment->author()->member_title}
As you can see, we use the $comment->author() list and then just the name of the field.
6. Getting some style
You can add some HTML and CSS in there to make your profile fields look awesome. Never hard-code CSS into your HTML, always define a class and add the styling into your CSS documents. You'll thank yourself later! Going back and editing a HTML document is far more painful than adjusting the CSS, especially when you're using the same style rules for multiple instances of an element.
Here's a basic block that would show the member title, posts, age field and play-by field:
<div class="blocko">
  <div class="allacross">{$comment->author()->member_title}</div>
  <div class="labl">Age:</div> <div class="valu">{$age}</div>
  <div class="labl">Play-by:</div> <div class="valu">{$playbi}</div>
  <div class="labl">Posts</div> <div class="valu">{$comment->author()->member_posts}</div>
</div>
And you might style it along the lines of this:
.blocko {display: flex; flex-wrap: wrap; font-weight: bold; text-transform: uppercase;}
.allacross {flex-basis: 100%; }
.labl {flex-basis: 50%; font-weight: Bold; }
.valu {flex-basis: 50%; }
This just creates a block where labl and valu display at 50% of the line they're on, while allacross takes up the full length of the block. Field labels are in bold, and the member title is set to bold and uppercase.
But this does create one problem: this HTML is going to be processed even if there's no information contained in that field. You'll get field names, but empty spaces---and that's gross. So here's how to fix it.
7. Checking for value, not printing empty fields
We need the system to check that there's information to output before it processes the HTML. We do that with an IF statement:
{{if $age}}
	{$age}
{{endif}}
The "if $age" portion of the statement asks if there is any information contained in the variable, and if there is to process the code between the if and endif tags. In the above case, it's just the variable itself. However, you can put HTML between those tags as well.
<div class="blocko">
  {{if $comment->author()->member_title}}
  	<div class="allacross">{$comment->author()->member_title}</div>
  {{endif}}

  {{if $age}}
  	<div class="labl">Age:</div> <div class="valu">{$age}</div>
  {{endif}}

  {{if $playbi}}
  	<div class="labl">Play-by:</div> <div class="valu">{$playbi}</div>
  {{endif}}

  {{if $comment->author()->member_posts}}
  	<div class="labl">Posts</div> <div class="valu">{$comment->author()->member_posts}</div>
  {{endif}}
</div>
In this example, because the divs containing each profile field display are inside the conditional IF statements, they will only appear on the page if there is information to display. This way, you won't get field labels with ugly spaces next to them.
But what if you don't want to show certain fields for certain usergroups?
8. Include/exclude based on member group
If you run a board that has account per character and player accounts, there are probably some fields that you don't want displaying for members vs characters. Again, we'll use an IF statement to tell the system not to output data if the comment->author() belongs to a certain member group.
{{if ($comment->author()->member_group_id != 4) and ($comment->author()->member_group_id != 6) and ($comment->author()->member_group_id != 11) }}

  {{if $age}}
  	<div class="labl">Age:</div> <div class="valu">{$age}</div>
  {{endif}}

  {{if $playbi}}
  	<div class="labl">Play-by:</div> <div class="valu">{$playbi}</div>
  {{endif}}

{{endif}}
My three OOC player groups have the ID numbers 4, 6, and 11. This line of code says that for anything between those tags, do not process if the comment->author() is in either of those groups. In plain English:
IF the comment author's member group is NOT 4, and NOT 6, and NOT 11: display the age field, and display the play-by field.
You can also flip this and tell the system to display a field if the comment->author() group number IS a particular value:
{{ if $comment->author->member_group_id = 4 }}
	{{if $comment->author()->member_title}}
  		<div class="allacross">{$comment->author()->member_title}</div>
  	{{endif}}
{{endif}}
This tells the system to display the member_title ONLY if the comment->author() group ID is 4.
You can find the ID numbers of your groups in your ACP by going to Members/Groups -- and hovering over the Edit button. The number at the end of that URL is the group's ID number.
9. Remove the standard custom field display
So you've got nice little code snippets to display your profile fields where you want and how you want, you don't need the default custom field list. So in the template, remove the following:
{template="customFieldsDisplay" group="global" app="core" params="$comment->author()"}
Now all you need to do is shuffle the template around and make it look how you want! Congrats!
10. Some other useful template snippets
The fully formatted username with reputation badge:
<h3 class='ipsType_sectionHead cAuthorPane_author ipsType_blendLinks ipsType_break'> <strong>{$comment->author()->link( $comment->warningRef() )|raw}</strong> <span class='ipsResponsive_showPhone ipsResponsive_inline'> {template="reputationBadge" group="global" app="core" params="$comment->author()"}</span></h3>
The user photo:
{template="userPhoto" app="core" group="global" params="$comment->author(), 'large', $comment->warningRef()"}
Author group name/icon:
<li>{expression="\IPS\Member\Group::load( $comment->author()->member_group_id )->formattedName" raw="true"}</li>
			{{if \IPS\Member\Group::load( $comment->author()->member_group_id )->g_icon }}
				<li><img src='{file="$comment->author()->group['g_icon']" extension="core_Theme"}' alt='' class='cAuthorGroupIcon'></li>
			{{endif}}
-
 1
1


